Posts Tagged House Projects
I Feel Rather Obsolete (House Projects, Fun Stuff)
Posted by Tom in Uncategorized on January 1st, 2010
2010 was ushered in not with a bang, but with a snore. Deb and I enjoyed a take-out supper from a fantastic local Italian restaurant by the fireside. We talked, watched part of a John Pinette comedy video…
…and then, time for bed.
To be honest, both of us were anxious to be shed of 2009. It has been perhaps the worst year of my life. In retrospect, I wish I could have traded it in for 2006. I probably shredded the receipt, so tough luck.
Today, we met some dear friends for brunch at the Lake Elmo Inn. Our appetites sated, we talked until the manager asked for our table back (honest!). The food was excellent, but the company was more nourishing.
The friends also gave me a gift that they had laying around their house unused: A Denon AVR-3803 surround-sound receiver. I was truly satisfied with circa-1989 stereo receiver that I was using. However, a free upgrade is a free upgrade, so I gratefully received it.
Looking at the back of that thing, I felt excited. Reading the manual, I feel truly…old. I’m in the in-between stage of getting rid of something I’m used to and getting to know something new. After hooking everything up (that I could do–I need to buy a few cables and adapters), it took me three minutes just to get some sound out of the silly thing.
Also, this means another side project–I need to pick up a couple of rear speakers and make speaker stands for the rear channels! Time to go to Best Buy and Home Depot!
Extreme Makeover, Basement Edition, pt. 4 (House Projects)
Posted by Tom in Uncategorized on September 14th, 2009
I’ll be taking a break from the basement makeover project, at least for a while. I didn’t post about it, but last week I finished goal #3 (the speaker pedestals). These were not a design revolution, but just something that I decided I wanted, but wasn’t going to pay the prices I was seeing in stores. Two pieces of plywood, separated by a 4-foot post did the trick. I drilled holes in the plywood bases and platforms for speaker wires to snake through, and stapled the wires to the backs to help keep them hidden. At some point, I’ll paint them black to give them aesthetic boost. Let’s be honest; they could use all the help they can get.
(Check back later for pictures)
I had some friends over last night for a guys’ movie night. After enjoying a few Loony Tunes cartoons, we watched a number titled Outlander. For what it was, we were happy: a mindless action movie. How much complaining is justified about a movie that is essentially vikings vs. aliens?
I’ve decided to add one more phase to the project, for the time being. I would like to hook up our Wii to the projector, but I don’t want the sensor bar to be stuck in the middle of the room. Alternately, I didn’t want to pay $20 for a wireless one.
After doing a little bit of research, I figured out the Wii’s sensor bar is merely a couple of infra-red lamps that allow the Wii’s controllers to determine their position and direction. Some people have even been able to substitute candles for the sensor bar. With a quick search on instructables.com, I found the basic plans to make my own sensor bar. The whole thing consists of two IR lamps, an on/off switch, a AA battery pack, and an LED lamp to show whether it’s turned on or off. I’m going to do my best to incorporate this into the screen without ruining any of my existing work (I wish that I had thought of this when I built it.
Extreme Makeover, Basement Edition, pt. 3 (House Projects)
Posted by Tom in Uncategorized on September 6th, 2009
This was the day I had been planning for: screen-building day. I had my materials (I thought), I had my tools (I thought), and I was going to knock this one out in about four hours (I thought).
First, the dimensions. The plans I was following were for a true movie proportion screen (2.35:1). I altered them for a more common 16:9 format. Of the three 1×4 8′ boards with which I had to work, I left two of them at 8′, then cut the remaining one into two 42″ lengths. This gave me a screen that was approximately 96″x52″, or about a 109″ diagonal screen. When I dug out my sanding block for the vertical boards, I realized that it had rotted too much to be useful. I’ve resigned myself that I can expect at least one trip to the local Home Depot in the middle of any project.

This is the width--Eight feet of video goodness, coming up.

Yes, this was my work bench. Don't laugh, please.
While I was buying sandpaper there, I paused to look at the hanging apparatus. I had purchased a couple of 100 lb. “Ooks” hooks, having had great success with them in the past. I knew that there was no way that this thing was going to be anywhere close to that weight, but Ooks are cheap enough to wildly overcompensate. But, I still wasn’t sure how I should hook the Ooks to the frame. I saw a complete Ook heavy object hanging kit that seemed to fit the bill.
Also, a good friend had agreed to loan me his staple gun for the project…but I decided that I couldn’t wait, so I picked one of those up as well. Another axiom: every successful project should involve buying at least one new tool. Otherwise, our economy would crumb-…never mind.
Back at house, I sanded both of the 8′ boards down to the same length and put them aside. Next, I took a 2′x2′ piece of plywood, and cut it diagonally both ways, forming four triangles. These were going to be the corner braces that would hold the frame together. After sanding the braces, I laid an 8′ and a 42″ board down at a right angle on the garage floor, and placed one of the braces over the corner, at 1/2 an inch from the edges. I then marked off places to put screws in at 1 1/2-inch intervals down and across. After marking all the places where I would put screws in, I laid all the braces down and drilled holes in all four braces at once.

It seems a bit much, but believe in "measure 10 times, drill once".
Next, it was time to move everything to the basement and assemble the pieces. I assembled the frame using 1-1/8″ wood screws. I had decided earlier that it would be best to figure out how and where to hang the thing before I attach the screen material. Looking at the Ook kit I purchased earlier, it was more complicated that what I had intended, primarily because there were no directions included inside the box. There were a couple of screw-on hanging loops, which is what I was really after. Those plus the 100-lb hooks I had already purchased were perfect together. I attached one of the hanging loops (surely there is an actual term for these things; if so, someone please leave it in a comment) and nailed in an Ook to test it out. On attempt #1, I realized that I had attached the loop too high on the frame, and the Ook was peeking out over the top of the frame. I reattached the loop farther down on the frame, and that worked perfectly. I C-clamped a level to the frame, and hung the other side. Perfect!

It was much easier to to a "dress rehearsal" without the fabric.
Finally, I layed out the blackout material across the floor, white side down. After being rolled up, there were now verticle fold lines all across the fabric. If anyone decides to do this project, I would recommend using a large tube to roll fabric around. However, in the end, it really didn’t matter, because it was stretched to the point where the folds weren’t visible.
I used my shiny new staple gun to attach the screen to the frame, gently pulling the fabric taut as I went. The only tricky part was the corners, because I had to carefully fold the cloth so that there were no wrinkles on the other side. Otherwise, it was surprisingly easy to work with, and in a few minutes I had my screen hung.

I'm rather proud of my corners.
The only other recommendation I would make would be to perhaps glue the cloth to the frame before stapling. I ended up with some wrinkles at the bottom; gluing may have avoided that.

The finished product
Finally, I hung the finished product, and tested it, as well as the video extension cord. I held my breath when I turned everything on. I’m happy to say that there were no sparks, no smoke, just a huge grin on my face.

Success!
Yes, those are folding chairs holding the speakers on either side of the screen. That will never do…
Playlist:
John Adams – Shaker Loops: A Final Shaking / Gustav Holst – Fugal Concerto: While making breakfast, I contemplated the act of creation, and how our joy in creating brings God’s joy. There is a certain holiness in creating for our own pleasure and the pleasure of others, echoing God’s pleasure in creating the universe for His pleasure and ours, too. These pieces were on at the time, and I don’t know if it sparked my thoughts or not; I just made a mental note to look up the titles.
Bluegrass Saturday Mornings: The local jazz station, KBEM, plays bluegrass music every Saturday morning. I have fond memories of working around the house, with Ian running around, listening to this. It’s been at least a year or two since I’ve worked outside with this music playing in the background. Regardless of your opinion of bluegrass music, it felt good.
Vigilantes of Love-Live at the 40-Watt: This is a great rock album to work to, and Bill Malonee writes some wonderfully poignant lyrics.
Jars of Clay-Redemption Songs: I picked this one up only recently. I love what they have done to some marvelous hymns. We used their arrangement of “I’ll Fly Away” for Ian’s memorial service.
Bebo Norman-Between the Dreaming and the Coming True
City on a Hill: Sing Alleluia
Next Step: The speaker stands
Extreme Makeover, Basement Edition, pt. 2 (House Projects, Graces and Mercies)
Posted by Tom in Uncategorized on September 5th, 2009
Yesterday, for the most part, I took the day off from the project, because I wanted to spend it with Deb. We went to the Nicolin Mansion in Jordan, MN, and we can’t recommend it highly enough. If you are looking for a relaxing getaway in the Minneapolis/St. Paul area, this would be the place to go (www.nicolinmansion.com).
The only project-related activity I did yesterday was ironing the screen material. For the screen itself, I’m using curtain blackout material. It’s an opaque fabric that’s sewn behind curtains to keep the sun from shining through. It’s very white, and should I decide to paint the thing later to have better color balance and reflectivity, I believe that it will hold paint nicely. When I bought the stuff (9 yards from a 54-inch bolt), I wasn’t paying enough attention and I allowed the clerk to fold the cloth up instead of rolling it into a tube. By the time I got home from work, there were creases down the width and length of it.
I covered the area I was ironing with a towel, and moved the iron slooooowly down the creases. It worked for the most part, but they were difficult to get out. I had to make multiple passes with the iron. If you decide to try this on your own, be very careful during this step; I got a few tiny scorch marks on the fabric. I found out after the fact that I should have had the ironing board underneath (I had the fabric laying on the floor to prevent more creases and to make things easier). When I attach the screen, I don’t plan on stretching it taught over the frame, but just enough to take care of any remaining creases. (I’ll post pictures of the fabric later this weekend).
One thing I forgot to mention from the last project-related post was the playlist. As certain songs keep running through my head or popping up on whatever music source is handy, I thought I would keep track of them, especially if there was any significance. So far:
- Barking at the Moon by Jenny Lewis: This is from the Bolt soundtrack. Bolt was a standard cute, CGI-animated movie about a little dog trying to get back home. It was also one of the last movies that I saw with Ian at the theater. My mother got to go with us (a rare treat), and we all enjoyed it very much. Ian especially loved the character named Rhino who was (of course) a hamster. This is a catchy little country tune about the importance of “your home”. Not only does it remind me of an enjoyable time with my son and mother, but it also reminds me of my eternal home, and how Ian is already there.
- Everything Sad is Coming Untrue (Part 1) by Jason Gray: Save yourself the trouble and buy the whole album. Actually, buy two copies, because you will probably want to share it with someone. Deb and I first heard Jason in late July, when he played at a conference we attended. If you have been following either Deb’s blog or the caring bridge, you might notice that Deb has been quoting his lyrics and liner notes quite a bit. Jason is a breath of fresh air in Christian music. For the past 15 years or so, I’ve been so focused on the “business” of Christian music (and turned off by some of the practices) that I lost sight of the fact that there are artists who are still in it as a ministry. Jason is one of those artists.
This song is a reference to the Lord of the Rings books (I don’t think the line is in the movies), when Samwise Gamgee is astounded that all of the tragedies that he thought had occurred are not true: he and Bilbo survived, Gandalf is alive (and in a more glorified state), all of his friends are alive and the evil force that had threatened the land is now gone forever. The idea that, someday, all of the bad things in this world are going to be “undone” is both fascinating and heartbreaking.
I find it fascinating, in that at any time I can look around and see dozens of things that will not exist in the new Heaven and new Earth. No more cigarette butts lying on the ground. No more air pollution warnings. No more lost relationships. No more doctors saying “there’s nothing else that can be done.” Actually, no more doctors. If you think about it, according to the Bible, we will have glorified bodies that will be perfect, with no more sickness or death. Ergo, no more doctors. At least, that’s what I believe here and now. When we are standing in Heaven (and, if you are not sure that you will be there, call me as soon as possible), feel free to either commend me on my theological insight, or point out that I really missed the mark. Then again, I think that we will both have better things to do.
I also find the idea of everything sad becoming untrue a bit heartbreaking, because it hasn’t happened yet. Every so often, I pray to God that “I’m ready, whenever you are.” Immediately, I feel God reminding me that He’s waiting on me (see Romans 10:14).
Next: Building the frame!
Extreme Makeover, Basement Edition, pt. 1 (House Projects)
Posted by Tom in Uncategorized on September 3rd, 2009
Sometimes, God gives me a deep and wonderful spiritual insight. When this occurs, I love to write a post about it to share with everyone, hoping that someone will be blessed and have a closer walk with Christ.
This isn’t one of those posts.
I’m starting a series that will chronicle my attempt to create the Henderson Cinema/Arcade/Presentation Center. The goal is to utilize our basement so that it can be an enjoyable space for watching movies and playing games, as well as watching video presentations for small groups. One condition of this is that I want to make as few modifications to the walls and ceiling of the basement as possible. Given my track record for home improvements, that ‘s best for everyone involved. Another is that the projector will be easily moveable, so that we can use it elsewhere.
The first stage of this project involves three tasks:
- Build a screen. This will be a wall-mounted 16:9 screen, probably 7.5′ x 4.5′.
- Build speaker stands. I’ve got a 2.1 sound system, which will be fine until I’m ready to install a surround-sound system. However, I need some way to elevate the two bookshelf speakers I will be using.
- Create an extension cord for the projector. I want the video sources off to the side of the room, but the projector will need to be centered in front of the screen. This will require a 15-pin extension cord for the video signal. I would like the cable to be about 20 feet long.
One more condition: I want to do this with as little expense as possible, within reason.
This could very well be a comedy of errors, considering that:
- I never took shop in high school. Let’s just say that working with wood is always a fresh journey for me.
- The number of power tools I own can be counted on one hand.
However, I have some advantages:
- I have all five fingers on that hand used to count power tools, unlike this guy:
- I have the Internet. I have found two or three plans for the screen, and one for the extension cord. The speaker pedestals will be something I dreamed up.
- Room. We’re not using the basement for anything else (except storage), so I have a lot of flexibility in projector placement. I hope to take this:

The future site of the Henderson Cineplex.
and turn it into…something else.
The Adventure Begins…
I started with the last item first, for some reason. I think it was a confidence-building thing.
As I said, I want to locate the video sources at least ten feet away from the project, and have some extra length for maneuvering. I found steps here to use a Cat5 cable to make a VGA cable. I have a 100-foot Cat5 cable that I haven’t been using, so I sacrificed about 20 feet of it for the sake of the cause. After slicing off the ends of the cable, I was left with this:

Man, that's a lot of wires.
Following the diagrams in the above link I soldered the colored wires into their appropriate sockets on the 15-pin connectors. I deviated from the plans a bit; instead of using two male connectors, I used a male & female connector, essentially making an extension cable. The reason for this is that I plan on having two video sources: my XBox 360 and a PC. The XBox 360 will be for games and DVDs; the PC will be for other streaming media. I’ll switch between the two using a KVM switch.
The soldering proved to less tricky that I imagined. For the past 15 years or so, I would occasionally see a project that involved soldering, and I would get the itch to make something. In high school, I made a guitar amplifier for a physics project, and loved the experience. My last experience with soldering involved putting a larger speaker into a different amplifier. Let’s just say that the end result included smoke, and a ruined amp.
After purchasing the necessary components from Radio Shack, I set to work soldering wires to connectors. The first three or so took much longer than I expected. Like a lot of small motor skill activities, it takes a little while to find the right pattern. Using a C-clamp to hold the VGA connector helped dramatically, and I remembered that it’s easier to melt the solder into the wire, then melt it again to the connection. A little while later, I behold my creation:

It's ugly, but it works...honest.
I tested the cable using an old computer and monitor, and was astounded that it worked. I then added the hoods for the finishing touch:

20+ feet of VGA goodness
Next up: Building the screen!
How to Unfreeze a Garage Door (House Projects, Tom)
Posted by Tom Henderson in Uncategorized on December 15th, 2008
If you read CaringBridge this morning, you will note that when I tried to leave home this morning, I was surprised to find our garage door was frozen shut. Yesterday, instead of snowing in the morning and early afternoon, it rained. Mix that with the snow that came later and the sub-zero temperatures we’re “enjoying” today, and you have the described predicament.
After I came to grips with the state of affairs, I turned to the geek’s best friend, Google. I was dismayed to find that if you Google “Garage Door Frozen Shut,” 75% of the advice is about car doors being frozen shut, 95% of the advice being about how to prevent it (not much help now, thankyouverymuch), and only a couple of items about how to solve the problem in the immediate sense.
So, in the interest of helping the community, here is what I did.
- Push button again, in the hope that the door opener didn’t understand your original intent.
- Blink.
- Pull the handle, trying to raise the door manually. Grunt loudly when the door, to your surprise, doesn’t move. Making a whimpering sound is optional, but recommended.
- Push up on the door, using all of your manly strength. Try to ignore the fact that you are being defeated by a thin layer of ice.
- Kick the door, secretly hoping that you aren’t going to dent it.
- Run a hair dryer along the inside bottom edge, knowing full well that you are attempting to warm the entire garage floor.
- Repeat the process on the outside bottom edge, knowing full well that you are now attempting to heat the garage floor and the state of Minnesota.
- Put ice melting salt on the outside bottom edge of the garage door, praying that some chemist was smarter than you currently feel.
- Go inside, eat three pancakes.
- Use Google to search for ways to un-freeze door. (see definition: “Insult to Injury”).
- Pour windshield wiper fluid on outside bottom edge of door, add more ice-melting salt.
- Play Yahtzee with son.
- Use a putty knife to separate door gasket from concrete.
- Success!
Danger on a Ladder (Catchup Post)
Posted by Tom Henderson in Uncategorized on November 2nd, 2007
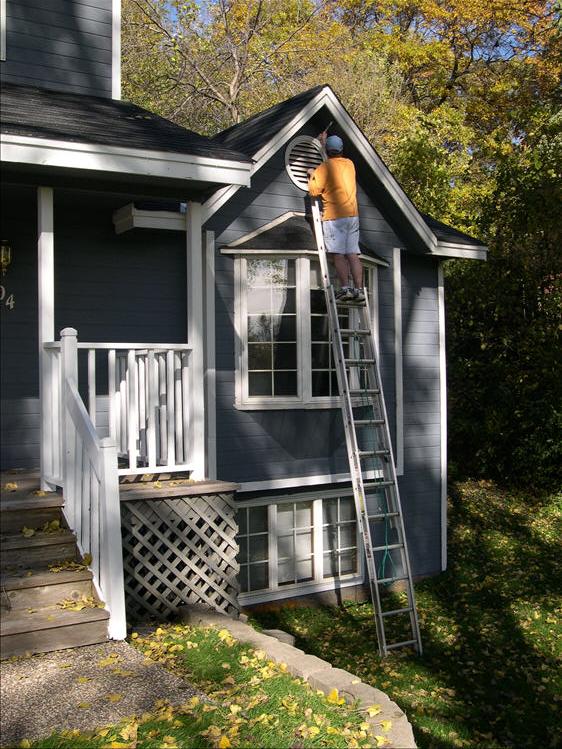
While I was wrapping up the painting on the front of our house, Ian had a friend over. We love to have Ian’s little buddies over. Ian gets more peer interaction, we get to help out some fellow parents, and Deb & I are able to get something done. Win-win-win, right?
While on the ladder shown above, I was listening to the radio, but was able to catch this tail end of a conversation between Ian and a friend, both holding pretend lightsabers:
“…Dad up on a ladder!”
“Yeah! Let’s whack it!”
Wrong.
I’m not scared of ladders; I just have a greater respect for gravity (and its consequences) while I’m on one. That bright idea got shut down, right away.
As promised, some pictures…
Posted by Tom Henderson in Uncategorized on September 24th, 2007
I promised some pictures last time, and I’m ready to deliver. And in only 3 days, too!
Well, anyway, there’s some catching up to do. First off, at the end of August, I went home to Southern Illinois to attend the funeral of my stepfather, Frank Robinson. I received a surprise on our driveway when I got back:
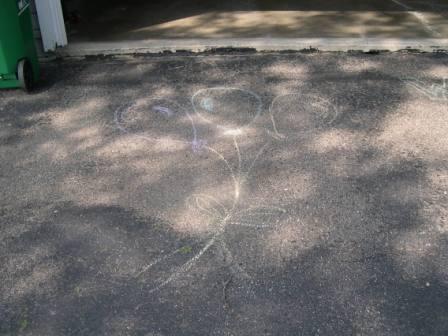
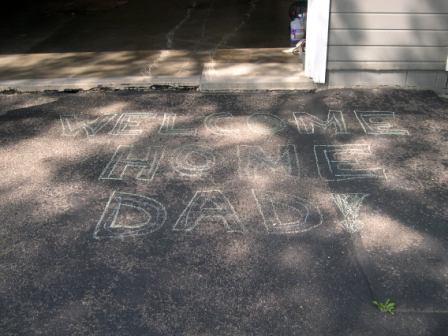
It might be a little hard to see, but the chalk drawing on the left is of some balloons. On the right are the words “Welcome Home Dad!” If you look at the top of the drawing on the rights, there are white chalk lines going into our garage; Ian drew me a parking space.
Next up, we have kindergarten pictures. A couple of weeks ago, Ian started Kindergarten:

 He was anxious to get there, but graciously paused long enough for a couple of pictures. When he finally got to his Kindergarten room, his patience was rewarded:
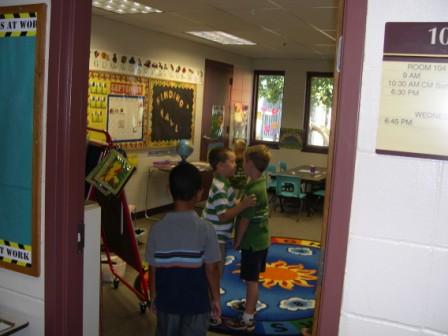 As soon as he walked in, he was confronted by one of his best friends, Adam. No doubt, they were discussing something of cosmic importance from the Star Wars universe.
Finally, I have been claiming for a couple of years that we needed to paint the house, and that this year (whatever year it happened to be) was the year it was going to be done. I am proud to say that Deb and I are almost done with the south side (the front of the house). Or, at least as much as we can do without a longer ladder. But, as evidence of our Herculean endeavor, here is a shot that shows off the old grey vs. the new grey: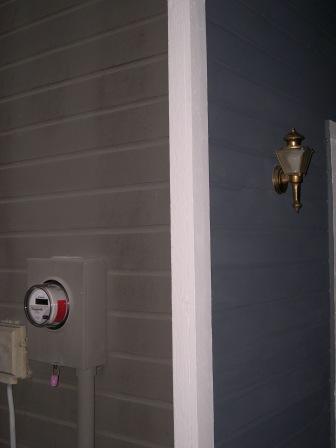 On the left is our old, dingy grey. On the right is the new, “bluer” grey. Once we get the shutters back up, I’ll post some more shots.
Recent Comments